Skip to content

PoE2 Cheatsheet

Classes

  • Twelve character classes based on three primary attributes: Strength (STR), Intelligence (INT), and Dexterity (DEX)
  • Each class has three Ascendancy specializations (36 total)
  • Each attribute combination has two unique classes (e.g., Warrior and Marauder for pure STR)
  • Classes are just starting points - any class can use any skill or item if they meet the requirements
  • Classes differ in:
    • Starting position on passive skill tree
    • Starting attributes
    • Quest rewards (?)
    • Available Ascendancy specializations
  • Classes sharing the same attributes share the same passive skill tree section with slight modifications

Ascendancies

  • Each class has 3 Ascendancy specializations (only 2 currently revealed per class)
  • Maximum of 8 Ascendancy points can be earned
  • Points are earned through either:
  • Ascendancy skills can be supported by support gems
  • Ascendancy skills level up based on character level
  • Cannot currently switch between Ascendancies (only respec points)
ClassAttribute FocusKnown Ascendancies
Warrior
Early Access
STRTitan
Warbringer
MarauderSTR-
Sorceress
Early Access
INTStormweaver
Chronomancer
Witch
Early Access
INTInfernalist
Bloodmage
Ranger
Early Access
DEXDeadeye
Pathfinder
HuntressDEX-
Mercenary
Early Access
STR/DEXWitchhunter
Gemling Legionnaire
DuelistSTR/DEX-
Monk
Early Access
DEX/INTInvoker
Acolyte of Chayula
ShadowDEX/INT-
DruidSTR/INT-
TemplarSTR/INT-

Basic Mechanics

Life and Energy Shield

Life is the main health resource that decreases when taking damage. When life reaches 0, the character dies and must be resurrected in town or at a checkpoint. Characters gain:

  • +12 maximum Life per level
  • +2 maximum Life per point of Strength
  • Life can be recovered through flasks, regeneration, or life leech
  • Low life is considered 35% or less of maximum life
  • Full life is 100% or more of maximum life

Energy Shield (ES) acts as an additional hit pool that:

  • Takes damage before life by default
  • Recharges at 12.5% per second after not taking damage for 4 seconds
  • Takes double damage from chaos damage
  • Is bypassed by bleeding and poison damage (these damage life directly)
  • Provides 50% chance to avoid stuns while ES is not depleted

Attributes

Characters have three primary attributes that provide inherent bonuses:

Attributes are required to equip items and gems. Characters start with 15 of their primary attribute and 7 of the others. Support gems add +5 to attribute requirements based on their color (red=STR, green=DEX, blue=INT).

Spirit

Spirit is aresource used to maintain persistent effects:

  • Required for auras, permanent minions, and trigger meta gems
  • No base spirit pool - gained through progression and sceptres
  • Fixed reservation costs (typically 30-120 spirit per effect)
  • Cannot be recovered or regenerated like other resources
  • Effects remain active until manually disabled
  • Spirit reservation can be reduced through passives and modifiers

Resistances

Resistance reduces incoming damage of a specific type by a percentage:

  • Applies to Fire, Cold, Lightning (Elemental) and Chaos damage
  • Default value is 0% (no effect on damage taken)
  • Maximum resistance is capped at 75% by default, but can be increased up to 90% (hard cap) through special modifiers
  • Negative resistance causes you to take increased damage
  • Completing each act permanently reduces all resistances by -10% (up to -60% total)
  • Final damage taken = Damage × (100 - Resistance)%
  • Resistance penetration:
    • Reduces target’s effective resistance
    • Has no effect once resistance is 0% or lower

Critical Hits

Critical hits deal increased damage based on Critical Damage Bonus:

  • Base Critical Damage Bonus is +100% (critical hits deal double damage)
  • Each hit rolls against Critical Strike Chance to determine if it crits
  • Base Critical Strike Chance comes from:
    • Weapon’s base Critical Strike Chance for attacks
    • Skill’s listed Critical Strike Chance for spells and certain skills
  • Critical Strike Chance modifiers are percentage based
    • Example: 100% increased Critical Strike Chance on 7% base = 14% final chance
  • Critical Damage Bonus can be increased through modifiers and gear
  • Attacks that crit must pass a second evasion check or be downgraded to non-crits

Accuracy and Evasion

Accuracy and Evasion work together to determine if attacks hit:

  • Accuracy is checked against target’s Evasion to determine hit chance
  • Only affects attacks (spells always hit)
  • Distance affects Accuracy for players and minions:
    • No penalty within 2 metres
    • Up to 90% less Accuracy beyond 12 metres
  • Chance to hit cannot go below 5%

Evasion provides chance to avoid Strikes and Projectiles:

  • Cannot exceed 95% chance to evade
  • Uses an entropy system to guarantee hits after enough evades
  • Only works against Strikes and Projectiles (not area damage)
  • Evaded hits prevent all damage and effects
  • Can be bypassed with Always Hits or Cannot Evade modifiers

Charges

Characters can gain three types of charges that empower abilities:

  • Endurance Charges (STR): Visually indicated as orange orbs
  • Frenzy Charges (DEX): Visually indicated as green orbs
  • Power Charges (INT): Visually indicated as blue orbs

Unlike PoE 1, charges no longer provide inherent bonuses. Instead, they are spent to enhance specific abilities.

Damage Conversion

Damage conversion changes one damage type into another:

  • Only applies to hit damage (not damage over time)
  • Occurs in two forms
    • #% of [Damage Type] Converted to [Damage Type]
    • Gain #% of [Damage Type] as Extra [Damage Type]
  • Gained as extra adds damage without removing the original
  • Converted to replaces the original damage type
  • Converted damage only scales with modifiers to the new type
  • All conversions are applied simultaneously
  • Skill conversion takes priority over item/passive conversion
  • If total conversion exceeds 100%, values are scaled down to 100%

Block

Block prevents damage from incoming Strikes and Projectiles:

  • Two types of blocking:
    • Passive Block: Chance-based blocking while holding a shield
    • Active Block: Raising shield to guarantee blocks from the front
      • Available on all shields except Bucklers
      • Blocked hits build up a stun meter
      • Active block ends if stun meter fills
  • Blocked hits still apply status effects (Stun, Freeze, etc.)
  • Cannot block while Stunned or Frozen
  • Some boss attacks cannot be blocked
    • Indicated by red glow and audio cue during windup
    • Can be blocked with special modifiers like “Can Block Damage from all Hits”
  • Damage over time cannot be blocked

Leech

Leech recovers resources (life, mana, or energy shield) based on hit damage dealt:

  • Only works with hit damage (not damage over time)
  • Amount leeched is a percentage of damage dealt after mitigation
  • Each leech effect recovers over 1 second
  • Multiple leech effects can occur simultaneously
  • Monster leech resistance reduces recovery:
    • Resistance increases with monster level
    • Final recovery = Damage Dealt × Leech % × (1 - Monster Leech Resistance)
  • Notable mechanics:
    • Vaal Pact keystone makes life leech instant but prevents life flask use
    • Some items like Couture of Crimson allow leech to overflow maximum life

Itemization

Items have two types of modifiers (mods): implicit and explicit modifiers. Each modifier adds one or more stats to the item. Press Alt when hovering over an item to toggle modifier details. Modifiers can have tags such as Fire, Physical, Life, etc that describe which stats they modify.

Modifier data is datamined from the game files or reverse-engineered through in-game experiments. Data will be published on poe2db.tw once it is available.

Implicit Modifiers

  • Appear above the separator line on an item
  • Determined by the base item type. For example, A Topaz Ring always has +#% to Lightning Resistance as its implicit modifier.
  • Most crafting currencies do not affect implicit modifiers. However, certain advanced crafting currencies may modify them.

Explicit Modifiers (Affixes)

  • Appear below the separator line on an item
  • Are usually added, removed, or modified through crafting currencies.
  • Come in two types:
    • Prefixes: Usually effect base stats like armor, damage, or life
    • Suffixes: Usually effect secondary stats like resistances or attributes
  • Normal items have no explicit modifiers
  • Magic items have up to 1 prefix and 1 suffix
  • Rare items have up to 3 prefixes and 3 suffixes
  • Unique items have fixed modifiers specific to the item
  • Each explicit modifier belongs to a tier, with higher tiers providing better stat value ranges.
    • Higher tier modifiers require higher item levels to spawn

Modifier Spawn Rules

  • Each base item type has a mod pool - the set of modifiers that can appear (spawn) on it
  • Modifiers have spawn weights that determine their probability to appear
  • If the spawn weight of a modifier is 100 and the total sum of weights of all spawnable modifiers is 10000, then the modifier has a 100 / 10000 = 1% chance to spawn on the item when a new modifier is rolled, e.g. when an item is identified or when using an Exalted Orb.
  • The mod pool is influenced by:
    • Item base type and tags
    • Item level determines available modifier tiers. Higher levels allow for higher tier modifiers.
    • Existing modifiers (through mod families)
  • Mod families restrict which modifiers can appear together:
    • Only one modifier from each family can exist on an item
    • Example: Can’t roll both +% Increased Fire Damage and +% Increased Lightning Damage on a Wand because they belong to the same family.

Mod weights and Crafting

  • Many crafting currencies can be understood as transformations of modifier spawn weights.
  • Examples
    • Greater Essence of the Body upgrades a magic item to a rare item with one life modifier. This currency can be understood as setting all spawn weights of modifiers that do not have a Life tag to zero and then applying a Regal Orb.
    • Omen of Sinistral Exaltation forces an Exalted Orb to only add prefix modifiers. This currency can be understood as setting all spawn weights of suffix modifiers to zero and then applying an Exalted Orb.

Item Tiers

  • New in PoE2 to make ground loot more relevant.
  • Monsters may drop items of 5 different tiers (1-5). An item of a higher tier prevents low tier modifiers from rolling on it, resulting in a higher chance of a “good” item.
  • Item tiers only affect ground loot. They have no effect on crafting.

Crafting

Crafting in Path of Exile 2 involves using currency items to modify item properties. Most crafting currencies either upgrade an item’s rarity or modify its modifiers.

Basic Crafting Currencies

Currency Usable On Effect
Orb of TransmutationOrb of Transmutation Normal items Upgrades a normal item to a magic item with 1 modifier
Orb of AugmentationOrb of Augmentation Magic items Adds 1 random modifier to a magic item (up to 2 total)
Orb of AlchemyOrb of Alchemy Normal items Upgrades a normal item to a rare item with 4 modifiers
Orb of ChanceOrb of Chance Normal items Randomly transforms a normal item into a magic, rare, or unique item
Regal OrbRegal Orb Magic items Upgrades a magic item to rare, keeping existing modifiers and adding one new modifier
Exalted OrbExalted Orb Rare items Adds 1 random modifier to a rare item (up to 6 total)
Orb of AnnulmentOrb of Annulment Magic or rare items Removes 1 random modifier from an item
Chaos OrbChaos Orb Rare items Removes a random modifier and adds a new random modifier
Artificer's OrbArtificer's Orb Martial weapons and armor Adds a socket to a martial weapon or armor
Armourer's ScrapArmourer's Scrap Armor Improves the quality of armor (up to 20%)
Blacksmith's WhetstoneBlacksmith's Whetstone Martial weapons Improves the quality of martial weapons (up to 20%)
Jeweller's OrbJeweller's Orb Skill gems Adds a socket to the gem. Comes in three tiers:
  • Lesser: For gems with 2 sockets
  • Greater: For gems with 3 sockets
  • Perfect: For gems with 4 sockets
Divine OrbDivine Orb Any item with numeric values Rerolls the numeric values of modifiers on an item
Vaal OrbVaal Orb Any item Corrupts an item with one of these effects:
  • Reroll up to 3 modifiers
  • Add a corruption enchantment
  • Add a socket ignoring socket limit
  • No change
Corrupted items cannot be modified further.

Advanced Crafting Currencies

Essences

Essences are crafting items that guarantee specific modifier types when used on items. They come in two varieties:

  • Regular Essences: Upgrade a normal item to magic with one guaranteed modifier
  • Greater Essences: Upgrade a magic item to rare with one guaranteed modifier

Omens

Omens are special currency items obtained from Ritual encounters that modify how other crafting currencies work. Only one omen can be active at a time, and the omen is consumed when its effect triggers. Examples include:

Catalysts

Catalysts are currency items obtained from Breach encounters that enhance specific modifier types on rings and amulets. Each catalyst:

  • Can add up to 20% quality to enhance specific modifier types (like Life or Attack modifiers)
  • Replaces any existing quality type on the item
  • Can enhance modifiers beyond 20% quality on special Breach Rings

Ailments

  • Ailments are status effects that can be applied to enemies through various means
  • The chance to inflict ailments depends on the pre-mitigation damage of the hit and the target’s ailment threshold.
  • The ailment threshold is typically equal to a monster’s life. It is adjusted for unique monsters such as bosses.
  • Ailment damage can be scaled multiplicatively using ailment effect modifiers or indirectly by scaling the hit damage.
Ailment Description
Bleeding
Damaging
Physical
  • Deals 15% of physical hit damage per second for 5 seconds
  • Deals 100% extra damage while target is moving
  • Requires explicit source of Bleeding chance
  • Damage bypasses energy shield
  • Does not stack, but multiple instances can exist with only highest damage instance active
  • Can be aggravated to always deal moving damage
Poison
Damaging
Chaos
  • Deals 20% of physical and chaos hit damage as chaos damage per second for 2 seconds
  • Damage bypasses energy shield
  • Requires explicit source of Poison chance
  • Multiple poison stacks can be active at once
  • Enemy damage mitigation (like Shock) affects poison damage taken
Ignite
Damaging
Fire
  • Deals 20% of fire hit damage per second for 4 seconds
  • Does not stack, only highest damage instance is active
  • Base chance is 1% per 4% of target's ailment threshold dealt
  • Only fire damage contributes to ignite chance and damage
Shock
Non-damaging
Lightning
  • Causes target to take 20% increased damage
  • Lasts 4 seconds by default
  • Base chance is 1% per 4% of target's ailment threshold dealt
  • Only lightning damage contributes to shock chance
Electrocute
Non-damaging
Lightning
  • Prevents target from acting (counts as Immobilized)
  • Lasts 5 seconds by default
  • Only certain skills can apply Electrocute
  • Regular lightning damage cannot inflict Electrocute
Chill
Non-damaging
Cold
  • Slows affected targets (maximum 50% slow)
  • Lasts 2 seconds by default
  • Cold damage determines chill magnitude
  • No explicit chance needed, but requires minimum threshold
Freeze
Non-damaging Buildup
Cold
  • Prevents target from moving or acting
  • Lasts 4 seconds by default
  • Cold damage contributes to freeze buildup
  • Frozen enemies Shatter when killed
Stun
Non-damaging Buildup
Physical
  • Interrupts target's action when stun buildup exceeds threshold
  • Physical and melee damage have higher stun buildup
  • Portion of buildup counts towards "Heavy Stun" for longer duration
  • Cannot build up stun while target is already stunned

Endgame Mechanics

Atlas

Atlas of Worlds

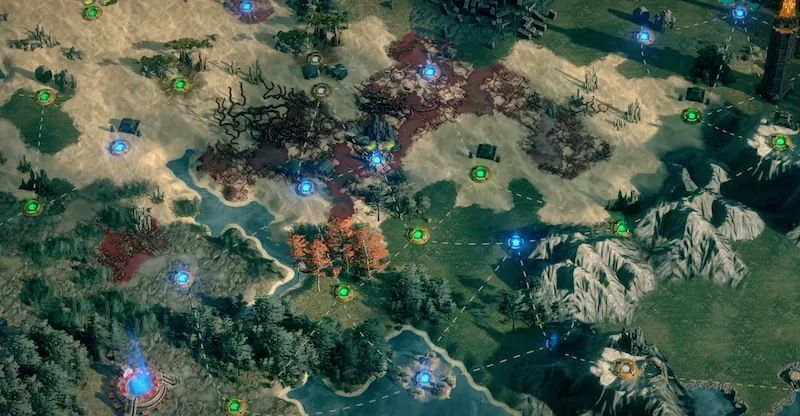
The Atlas of Worlds is the primary endgame system, unlocked after completing Act 3 on Cruel difficulty. It is an infinite map that expands in all directions from the central Vaal Ziggurat. Players use Waystones (similar to maps in PoE1) to open portals to different locations, with the goal of cleansing corruption.

Map Progression

  • Blue portals show currently accessible maps
  • Grey portals show potential progression paths
  • Green portals show completed maps
  • Complete a map by defeating all rare and unique monsters
  • Failed maps become inaccessible and require finding alternate paths

Waystones

  • Required to enter maps, come in tiers 1 through 16
  • Higher tiers increase monster level and rewards
  • Can be crafted with prefixes (beneficial) and suffixes (dangerous)
  • More dangerous suffixes increase waystone drop chances

Lost Towers (Precursor Towers)

  • Special structures that reveal large areas of the Atlas when completed
  • Accept Precursor Tablets to add mechanics to nearby maps
  • Multiple towers can overlap effects on a single map

Atlas Passive Tree

  • Complete maps to earn Atlas passive points
  • Customize your mapping experience with points spent on increased monster density, higher chances of mechanics to appear, better rewards from specific content types, and others.
  • Each endgame mechanic (Breach, Ritual, etc.) has its own specialized tree
  • Defeating pinnacle bosses grants points for their respective trees

Breach

Breach

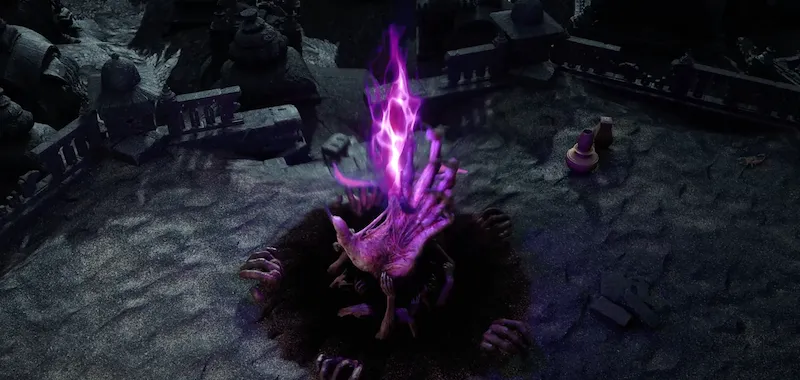
Breaches are timed monster-spawning portals. Interact with the Breach Hand in a map to activate the breach. Active breaches will expand their circle outwards and spawn monsters. The faster the monsters are killed the faster the circle expands. Keep killing monsters to keep the breach active.

Rewards

  • Breach Tablets are used to add more Breaches to the atlas.
  • Catalysts add quality to rings or amulets that enhances their modifiers. The maximum quality of an item is 20%.
  • Breach Rings are a special base type of rings that can have their quality enhanced by up to 50% instead of the usual 20%.
  • Combine 300 Breach Splinters into a Breachstone to access the Twisted Domain and challenge the pinnacle boss.

Pinnacle Encounter

Use 300 Breach Splinters to create a Breachstone. Use the Breachstone in the Realmgate to open a portal to the Twisted Domain, containing a single large breach. Complete the breach to fight the pinnacle boss Xesht, We Who Are One.

Ritual

Ritual

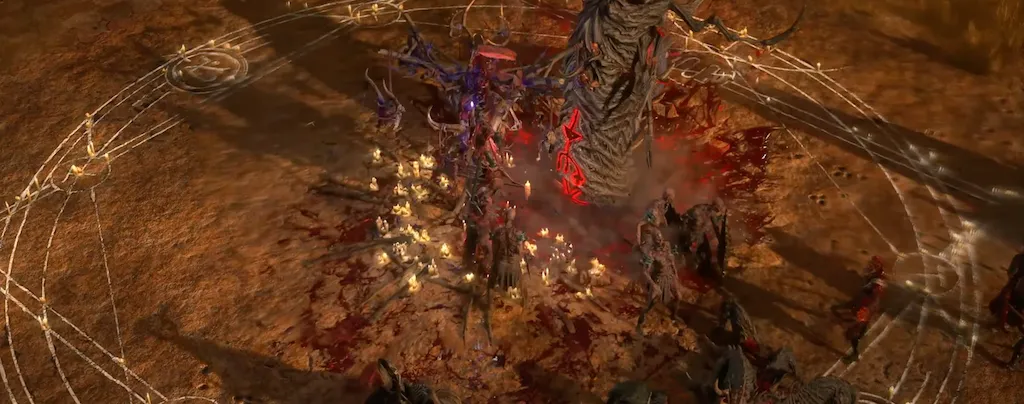
Find Ritual Altars and kill monsters within their circle to feed the altar. An area with the Ritual mechanic contains multiple altars and each altar also spawns all previously sacrificed monsters. Activate an altar and kill the resurrected monsters to gain Tribute. Exchange tribute at the altar for gear and currency items. Tribute from one map does not carry over to subsequent maps, but you can defer items if you have insufficient tribute to buy them now.

Rewards

  • Ritual Tablets are used to add more Rituals to the atlas.
  • Omens can be bought with tribute at the altar. They are used to influence crafting outcomes and allow for metacrafting. For example, an Omen of Dextral Annulment forces an Orb of Annulment to only remove suffix modifiers.

Pinnacle Encounter

Complete Rituals to gain entry to the Crux of Nothingness and fight the The King in the Mists. The exact mechanic to gain entry is currently unknown. In PoE1 you could find An Audience With The King as a reward from Ritual Altars.

Delirium

Delirium

Interact with a Mirror of Delirium to cover the area in a silvery mist. The mist spawns additional monsters and makes all enemies both more dangerous and more rewarding. The deeper you travel into the mist, the stronger the effect becomes. Monsters in the mist deal more damage and take less damage.

Rewards

  • Delirium Tablets are used to add more Delirium encounters to the atlas.
  • Distilled Emotions can be used to:
    • Instill amulets with notable passive skills from the passive tree
    • Add layers of Delirium to maps via Waystones (up to 3 layers)
  • Collect Simulacrum Splinters that drop from monsters killed in the mist.

Pinnacle Encounter

Combine 300 Simulacrum Splinters to create a Simulacrum. Use the Simulacrum in a Realmgate to enter the pinnacle encounter. Fight waves of increasingly difficult monsters, with each wave providing rewards. Higher difficulty waves have a chance to spawn Delirium bosses. Complete up to 15 waves for maximum rewards.

Expedition

Expedition

Team up with the Kalguuran settlers to excavate ancient ruins. Place explosive charges to unearth both treasure and undead monsters. The explosives will detonate in sequence, activating everything in their radius including monsters, chests and Remnants. Remnants modify all subsequent explosions in the sequence, potentially increasing rewards but also making monsters more dangerous.

Rewards

  • Expedition Tablets are used to add more Expedition encounters to the atlas.
  • Artifacts are special currencies that can be traded with Kalguuran NPCs:
    • Dannig - Trades other expedition currencies
    • Gwennen - Gambles artifacts for random items
    • Tujen - Trades various currency items
    • Rog - Offers special crafting services
  • Logbooks are special map items containing large expedition encounters with multiple explosive sequences.

Pinnacle Encounter

Run high-tier Logbooks for a chance to encounter the pinnacle boss Olroth. Defeating Olroth grants Atlas passive points that can be used to enhance the Expedition mechanic.

Trial of the Sekhemas (Sanctum)

Sanctum

The Trial of the Sekhemas is a roguelike dungeon consisting of 4 floors with 8 rooms each. Instead of life, you use Honour as your primary resource - taking damage reduces your Honour, and running out fails the trial. Each room presents different challenges like filling blood chalices, disabling death crystals, or surviving waves of monsters. Collect Sacred Water to purchase temporary buffs and recover Honour between rooms.

Rewards

  • Time-Lost Jewels - Special jewels that modify passive nodes within their radius
  • Relics - Craftable items that provide buffs for future trial runs
  • Keys to open reward caches after defeating floor bosses: Bronze Caches, Silver Caches, and Gold Caches.
  • Ascendancy points upon completing floors at certain level thresholds

Bosses

Each floor ends with a boss fight:

Trial of Chaos (Ultimatum)

Ultimatum

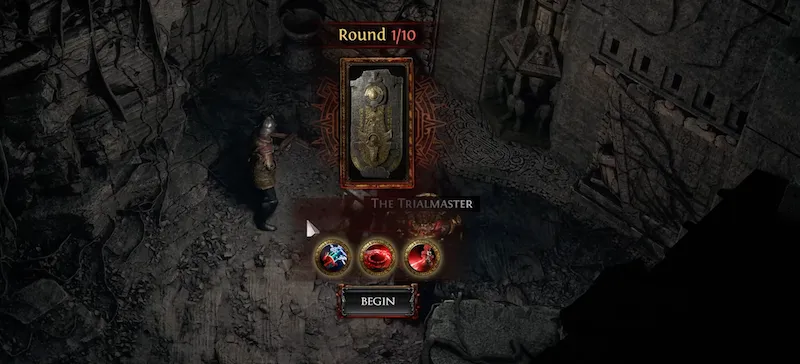
The Trial of Chaos is a gauntlet of increasingly difficult challenge rooms. Each room requires you to either defeat waves of monsters, survive until a timer expires, or escort a statue to its destination. After each room, the Trialmaster offers you a reward and three modifiers to choose from. Each modifier persists through subsequent rooms, making the trial exponentially more challenging. Complete up to 10 rounds for maximum rewards, but fail a single room and you lose everything.

Rewards

  • Soul Cores - Socket these into martial weapons and armor for powerful enchantments
  • Vaal Orbs - Currency that corrupts items for powerful but unpredictable effects
  • Inscribed Ultimatums - Special trials that let you wager items:
    • Prefixes determine potential rewards (like doubling sacrificed currency)
    • Suffixes add dangerous modifiers to the trial

Pinnacle Encounter

Collect three Fates to unlock a Trialmaster’s Tower and fight the Trialmaster. Fates appear to be rewards from completing high-difficulty trials.